Annotation tools
For workspace outputs, a variety of different tools are available to annotators in the workspace depending on what type of output they're working on. For Image Annotation workspace outputs, the available tools will also depend on whether the image is in vector or raster format.
In some cases, in the project settings, you can customize what tools to enable or disable in the workspace.
Here's a breakdown of what tools appear and when:
| Workspace output | Layer type | Available tools | Customizable in project settings? |
|---|---|---|---|
| Image Annotation | Vector | Point Line Arrow Rectangle Slider rectangle Polygon Cuboid (2D) Keypoint | Yes |
| Image Annotation | Raster | Paintbrush Fill Superpixel | Yes |
| Video | Vector | Point Line Arrow Rectangle Slider rectangle Polygon Cuboid (2D) Keypoint | Yes |
| Point Cloud | Vector | Cuboid (3D) | No |
| Sensor Fusion | Vector | Cuboid (3D)* *The Sensor Fusion output is constructed using a main Point Cloud workspace output and one or more optional reference Video/Image Annotation workspace outputs. Since the annotation takes place on the main Point Cloud workspace, the only tool available for now is the cuboid. | No |
Vector tools
Examples are shown below of what each type of vector tool looks like in the workspace, as well as how the results of that tool are structured in JSON export files.
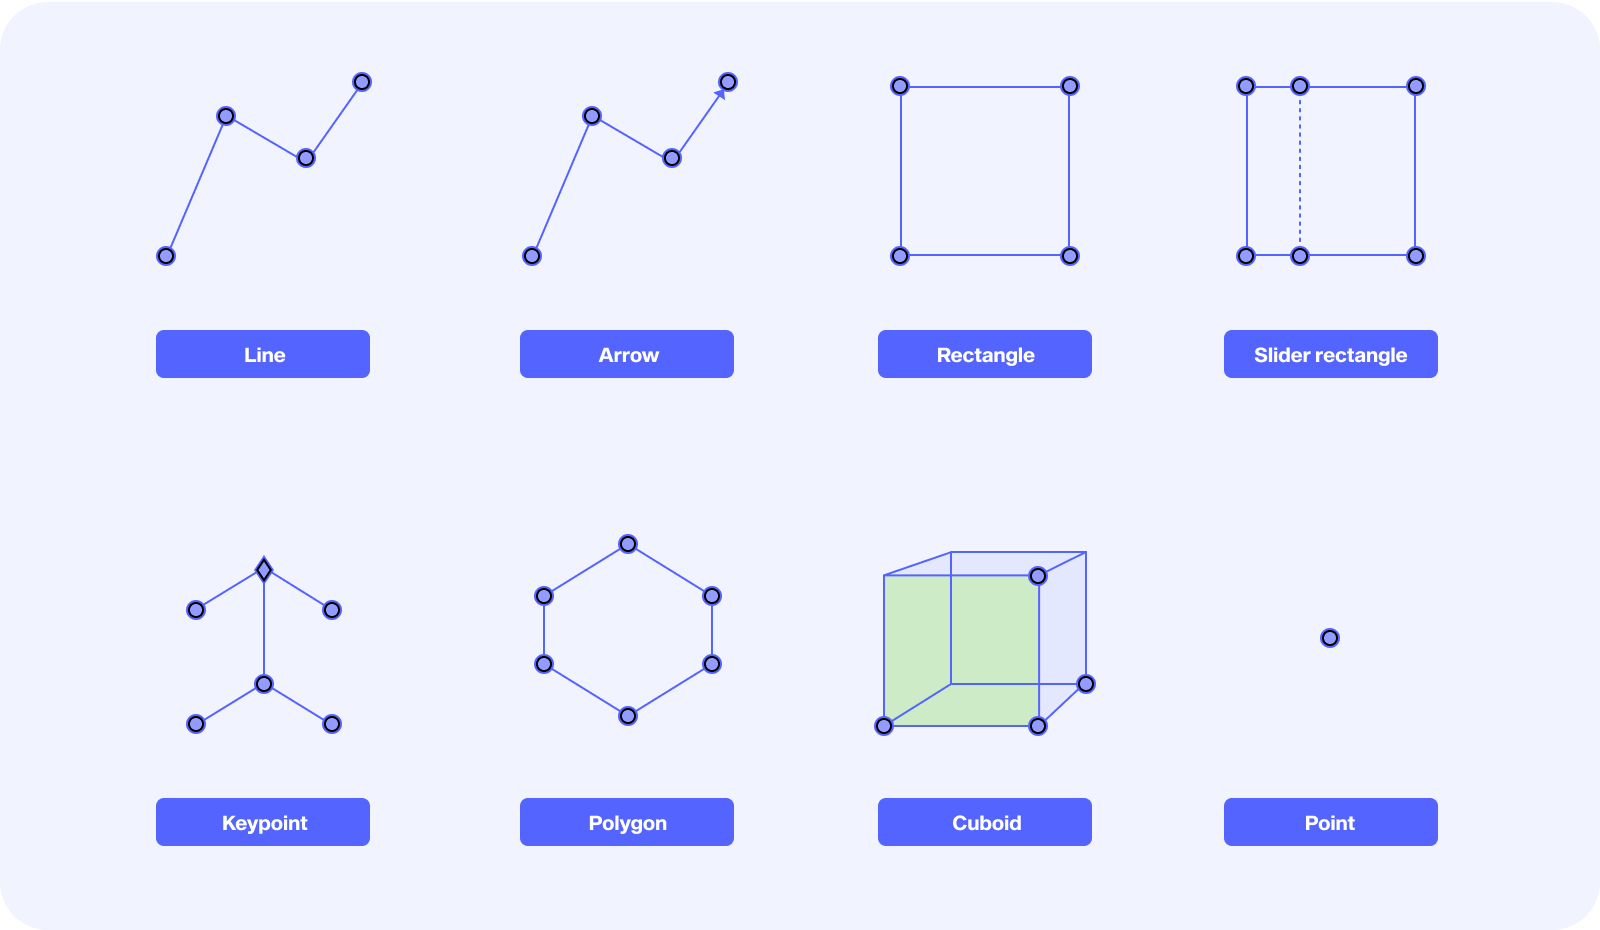
Point

"shapes": [
  {
    "tags": {
      ...
    },
    "type": "point",
    "index": 1,
    "key_locations": [
      {
        "tags": {
          ...
        },
        "points": [
          [
            262,
            57
          ]
        ],
        "visibility": 1,
        "frame_number": 0
      }
    ],
    ...
  }
Line

"shapes": [
  {
    "tags": {
      ...
    },
    "type": "line",
    "index": 2,
    "key_locations": [
      {
        "tags": {
          ...
        },
        "points": [
          [
            491,
            113
          ],
          [
            547,
            56
          ],
          [
            650,
            63
          ],
          [
            682,
            28
          ]
        ],
        "visibility": 1,
        "frame_number": 0
      }
    ],
    ...
  }
Arrow

"shapes": [
  {
    "tags": {
      ...
    },
    "type": "arrow",
    "index": 3,
    "key_locations": [
      {
        "tags": {
          ...
        },
        "points": [
          [
            867,
            104
          ],
          [
            950,
            50
          ],
          [
            1029,
            51
          ],
          [
            1065,
            82
          ]
        ],
        "visibility": 1,
        "frame_number": 0
      }
    ],
    ...
  }
Rectangle

"shapes": [
  {
    "tags": {
      ...
    },
    "type": "rectangle",
    "index": 4,
    "key_locations": [
      {
        "tags": {
          ...
        },
        "points": [
          [
            180,
            256
          ],
          [
            322,
            256
          ],
          [
            180,
            384
          ],
          [
            322,
            384
          ]
        ],
        "visibility": 1,
        "frame_number": 0
      }
    ],
    ...
  }
Slider rectangle

"shapes": [
  {
    "tags": {
      ...
    },
    "type": "slider_rectangle",
    "index": 5,
    "key_locations": [
      {
        "tags": {
          ...
        },
        "points": [
          [
            554,
            253
          ],
          [
            700,
            253
          ],
          [
            554,
            384
          ],
          [
            700,
            384
          ],
          [
            641,
            253
          ]
        ],
        "visibility": 1,
        "frame_number": 0
      }
    ],
    ...
  }
Polygon

"shapes": [
  {
    "tags": {
      ...
    },
    "type": "polygon",
    "index": 6,
    "key_locations": [
      {
        "tags": {
          ...
        },
        "points": [
          [
            911,
            264
          ],
          [
            1030,
            232
          ],
          [
            1122,
            325
          ],
          [
            979,
            396
          ],
          [
            870,
            348
          ],
          [
            923,
            328
          ]
        ],
        "visibility": 1,
        "frame_number": 0
      }
    ],
    ...
  }
Cuboid
The Cuboid tool is different depending on whether it is being used in 2D (Image Annotation, Video) or 3D (Point Cloud, Sensor Fusion).
Cuboid (2D)

2D cuboids are described in the JSON output file as two sets of points: points and keypoints (denoted by P and KP, respectively, in the figure above).
For the keypoints:
- KP1 corresponds to the horizon
- KP2 and KP3 define which of the six sides of the cube is facing forward (shown by a yellow face in the workspace)
- KP4 denotes the depth of the cube
- KP5 denotes the height of the cube
For the points:
The points are computed from the keypoints above.
- P1, P2, P3, and P4 correspond to the corners of the front face of the cube
- P5, P6, P7, and P8 correspond to the corners of the back face of the cube
"shapes": [
  {
    "tags": {
      ...
    },
    "type": "cuboid",
    "index": 7,
    "key_locations": [
      {
        "tags": {
          ...
        },
        "points": [
          [
            411,
            632
          ],
          [
            411,
            539
          ],
          [
            312,
            629
          ],
          [
            312.0,
            537.5942857142857
          ],
          [
            449,
            602
          ],
          [
            449.0,
            524.9428571428572
          ],
          [
            366.1883084984444,
            599.9343376453251
          ],
          [
            366.1883084984444,
            523.9749467823809
          ]
        ],
        "visibility": 1,
        "frame_number": 0,
        "key_points": [
          [
            193,
            457
          ],
          [
            312,
            629
          ],
          [
            411,
            632
          ],
          [
            449,
            602
          ],
          [
            411,
            539
          ]
        ]
      }
    ],
    ...
  }
Cuboid (3D)
The (x,y,z) vertices of each 3D cuboid are always exported in the following pattern: one full face and then the other full face. In this diagram, the side bounded by 3-1-2-0 is one face of the cuboid and the side bounded by 7-5-6-4 is the other face of the cuboid. These faces may be “front” and “back,” “left” and “right,” or “top” and “bottom,” depending on the cuboid’s rotation in the data.
The cuboid vertex export order can be used to define a face of interest. The face of interest is defined by the first four vertices of the cuboid listed in the export file. A face of interest, or side of the cuboid, can be used to designate the front of a car or the direction of movement of an object bounded by a cuboid. Therefore, there is always a default face of interest.

As an illustrative example, consider the Point Cloud workspace below, where a single vehicle has been delimited by a cuboid.
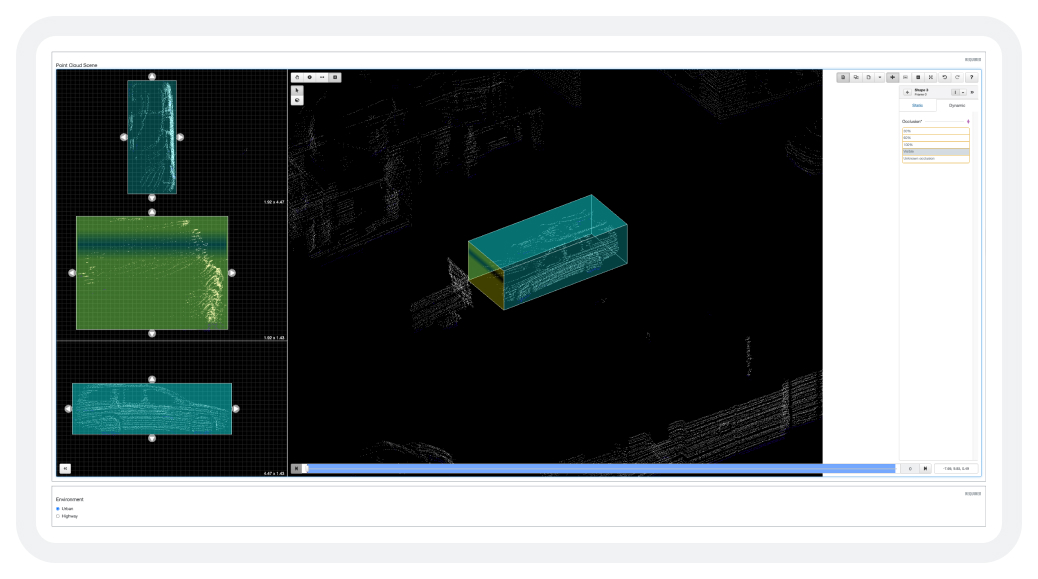
The JSON for this object would be as follows:
"Point Cloud Scene": [
  {
    "shapes": [
      {
        "tags": {
          "Parent": "None",
          "Answers": "TYPE_VEHICLE",
          "Occlusion": ""
        },
        "type": "cuboid",
        "index": 3,
        "key_locations": [
          {
            "tags": {
              "Occlusion": "Visible"
            },
            "points": [
              [
                -2.64196,
                3.93875,
                -1.82775
              ],
              [
                -2.64196,
                3.93875,
                -0.40086
              ],
              [
                -2.64196,
                5.85652,
                -1.82775
              ],
              [
                -2.64196,
                5.85652,
                -0.40086
              ],
              [
                1.83147,
                3.93875,
                -1.82775
              ],
              [
                1.83147,
                3.93875,
                -0.40086
              ],
              [
                1.83147,
                5.85652,
                -1.82775
              ],
              [
                1.83147,
                5.85652,
                -0.40086
              ]
            ],
            "visibility": 1,
            "frame_number": 0,
            "position_center": [
              -0.40525,
              4.89764,
              -1.1143
            ],
            "direction": {
              "roll": 0.0,
              "pitch": 0.0,
              "yaw": 3.141592653589793
            },
            "dimensions": {
              "length": 4.47343,
              "width": 1.91777,
              "height": 1.42689
            }
          }
        ],
        ...
 }
- The first 4 points represent the face of interest.
- The
position_center(x,y,z) is the center point of the cuboid. - Dimensions are the length(along x-axis), width(along y-axis) and height(along z-axis) of the cuboid.
- Direction is the roll, pitch and yaw of the cuboid; applied in that respective order and in radians. Using direction, it is easy to determine any faces of interest (such as the front of a cuboid that may represent the front of a vehicle). For specific faces of interest that depend on annotation instructions, use points as above.
Keypoint

In the JSON export file, the keypoint options (classes and connections) are summarized in the nested JSON object _extras, as shown below.
{
  "tasks": [
    {
      "id": "6124f0ceda72d104a1e0b23b",
      "project_id": 8613,
      "priority": 0,
      "created_at": "2021-08-24T13:17:34.241Z",
      "state": "completed",
      "data": {
        ...
      },
      "answers": {
        ...
      },
      "batch_id": 70718,
      "task_url": "https://api.sama.com/projects/8613/tasks/6124f0ceda72d104a1e0b23b",
      "_extras": {
        "keypoint_options": {
          "Video": {
            "classes": {
              "Keypoint Class": {
                "points": [
                  "Keypoint 1",
                  "Keypoint 2",
                  "Keypoint 3",
                  "Keypoint 4",
                  "Keypoint 5",
                  "Keypoint 6"
                ],
                "connections": [
                  {
                    "from": "Keypoint 1",
                    "to": "Keypoint 2"
                  },
                  {
                    "from": "Keypoint 1",
                    "to": "Keypoint 4"
                  },
                  {
                    "from": "Keypoint 1",
                    "to": "Keypoint 3"
                  },
                  {
                    "from": "Keypoint 4",
                    "to": "Keypoint 5"
                  },
                  {
                    "from": "Keypoint 4",
                    "to": "Keypoint 6"
                  }
                ]
              }
            }
          }
        }
      }
    }
  ]
}
Raster tools
There are three different raster tools, which each have different options in the secondary toolbar in the workspace:
- Paintbrush (a)
- Fill (b)
- Superpixel (c)
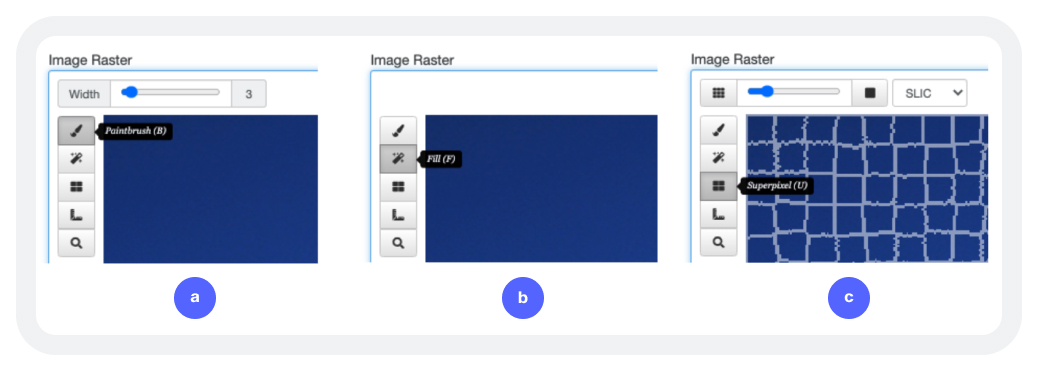
The tools are used to assign a category to each pixel of the image. All pixels are assigned a "no label" category to start with, and the annotation process consists of assigning categories to the pixels of the different objects in the image.
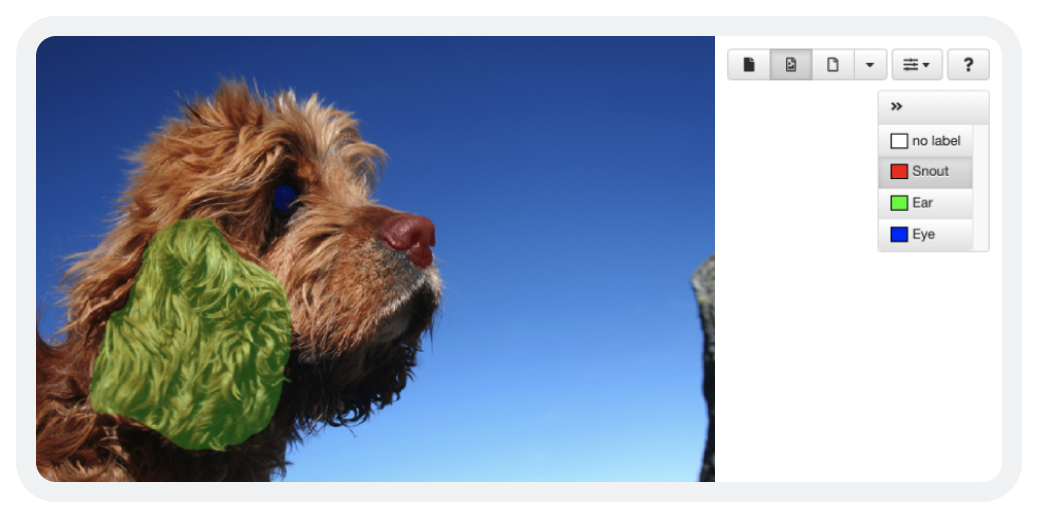
The output of this type of annotation takes the form of a greyscale image, a raster mask, where the value of a pixel represents the category to which it has been assigned.
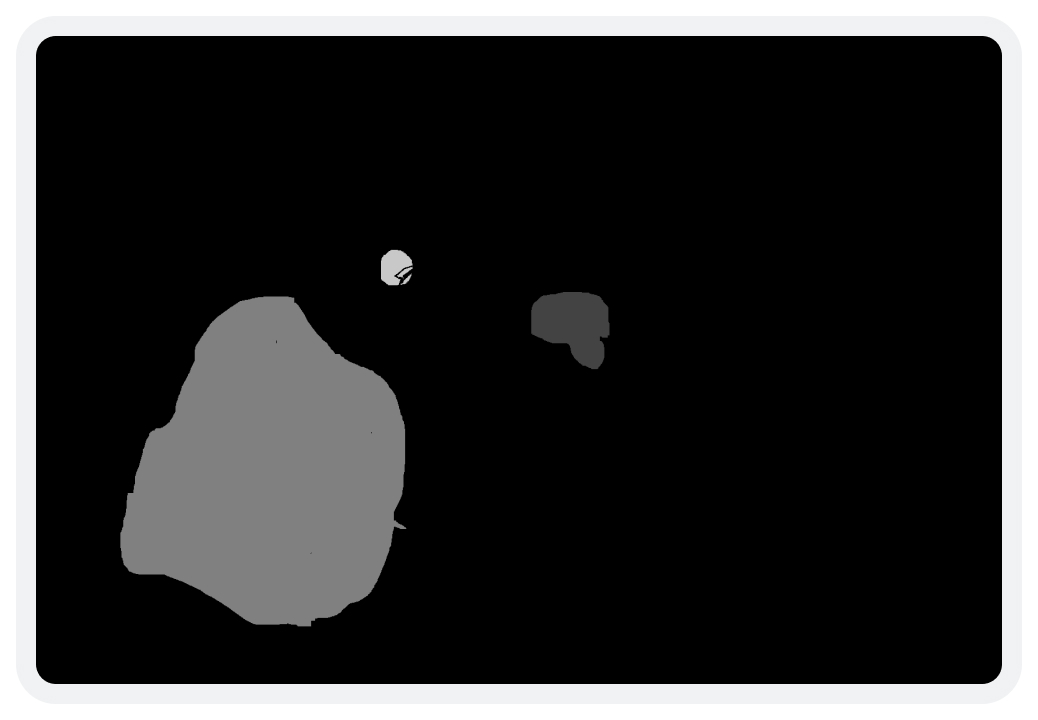
The location of the raster mask image is listed in the output JSON file under the mask_url key:
{
  "tasks": [
    {
      "id": "6125acb53928ed00e6fc55fa",
      "project_id": 8616,
      "priority": 0,
      "created_at": "2021-08-25T02:38:38.847Z",
      "state": "completed",
      "data": {
        "Image Raster Original file name": "dog.png",
        "Image Raster Size": "1414221",
        "Image Raster Height": "1152",
        "Image Raster Width": "1729",
        "Image Raster Original url": "https://assets.samasource.org/8616/dog.png?Policy=eyJTdGF0ZW1lbnQiOlt7IlJlc291cmNlIjoiaHR0cHM6Ly9hc3NldHMuc2FtYXNvdXJjZS5vcmcvMjMvamVyb21lLXRlc3QvODYxNi9kb2cucG5nIiwiQ29uZGl0aW9uIjp7IkRhdGVMZXNzVGhhbiI6eyJBV1M6RXBvY2hUaW1lIjoxNjI5ODY4NTAyfX19XX0_&Signature=IE2FAi7aWTedNtV7OPBNCVQsPnUGON1EcGJDX5LR0Py3HVHtrzo6QwUI1dk9qiEeZLReKRc0tE-sBB0JG-r2gVFhGUVy~V0qiLSfvKYc8KQ3gdNTjr0ZzxaevtuUHnJQvggcugFoZ490NLPEe99ggD0ACtaXDNdLUPqt~oLXpN~iDREovNe-TmFI~CGtuU4Dq6R6ktBJkdZ8~XijRtBLyYYly7nb01hCT~eE8Tf5oKRpaq30E1SFkjHbacRw4IBy4mrMkpjMVPtbc0Z034CLh1zufIK~btVu9zxNwFSWY3PbZNsKFSemZIu0mkZGk08j8xikqGlllnCWh4HWMxs-ag__&Key-Pair-Id=APKAI3VFKBKGZNMXJ2MQ",
        "image": "https://assets.samasource.org/8616/dog.png?Policy=eyJTdGF0ZW1lbnQiOlt7IlJlc291cmNlIjoiaHR0cHM6Ly9hc3NldHMuc2FtYXNvdXJjZS5vcmcvMjMvamVyb21lLXRlc3QvODYxNi9kb2cucG5nIiwiQ29uZGl0aW9uIjp7IkRhdGVMZXNzVGhhbiI6eyJBV1M6RXBvY2hUaW1lIjoxNjI5ODY4NTAyfX19XX0_&Signature=IE2FAi7aWTedNtV7OPBNCVQsPnUGON1EcGJDX5LR0Py3HVHtrzo6QwUI1dk9qiEeZLReKRc0tE-sBB0JG-r2gVFhGUVy~V0qiLSfvKYc8KQ3gdNTjr0ZzxaevtuUHnJQvggcugFoZ490NLPEe99ggD0ACtaXDNdLUPqt~oLXpN~iDREovNe-TmFI~CGtuU4Dq6R6ktBJkdZ8~XijRtBLyYYly7nb01hCT~eE8Tf5oKRpaq30E1SFkjHbacRw4IBy4mrMkpjMVPtbc0Z034CLh1zufIK~btVu9zxNwFSWY3PbZNsKFSemZIu0mkZGk08j8xikqGlllnCWh4HWMxs-ag__&Key-Pair-Id=APKAI3VFKBKGZNMXJ2MQ",
        "name": "task1"
      },
      "answers": {
        "Image Raster": {
          "layers": {
            "raster_coding": {
              "mask_url": "https://samahub3.s3.amazonaws.com/clients/23/external/projects/8616/tasks/6125acb53928ed00e6fc55fa/outputs/Image%20Raster/d1bdde4b-3d01-47d3-8536-4952eb871969.png"
            }
          }
        }
      },
      "submitter_ids_by_step": {
        "Step A": 15131
      },
      "batch_id": 70772,
      "task_url": "https://api.sama.com/projects/8616/tasks/6125acb53928ed00e6fc55fa"
    }
  ]
}
If you have been provided with the right credentials, you can download the mask using the AWS CLI.
aws s3api get-object --bucket samahub3 --key "clients/23/external/projects/8616/tasks/6125acb53928ed00e6fc55fa/outputs/Image Raster/d1bdde4b-3d01-47d3-8536-4952eb871969.png" raster-mask.png
Updated over 2 years ago
